Hello dear Amigurumi Knitting Lovers,Today we share a free amigurumi crochet pattern for you.
As you know, we share new amigurumi free patterns every day. master crochets, amigurumi gazelles, amigurumi bears, amigurumi pola, amigurumi pandas, amigurumi penguins, amigurumi giraffes, amigurumi lama, amigurumi pigs, amigurumi rabbit, amigurumi clowns, amigurumi dolls, amigurumi unicorn, amigurumi elephants, amigurumi unicorn , amigurumi hippos, amigurumi monkeys, amigurumi cats, amigurumi dogs and more…
Don’t forget to subscribe to receive notifications of our new free recipes.
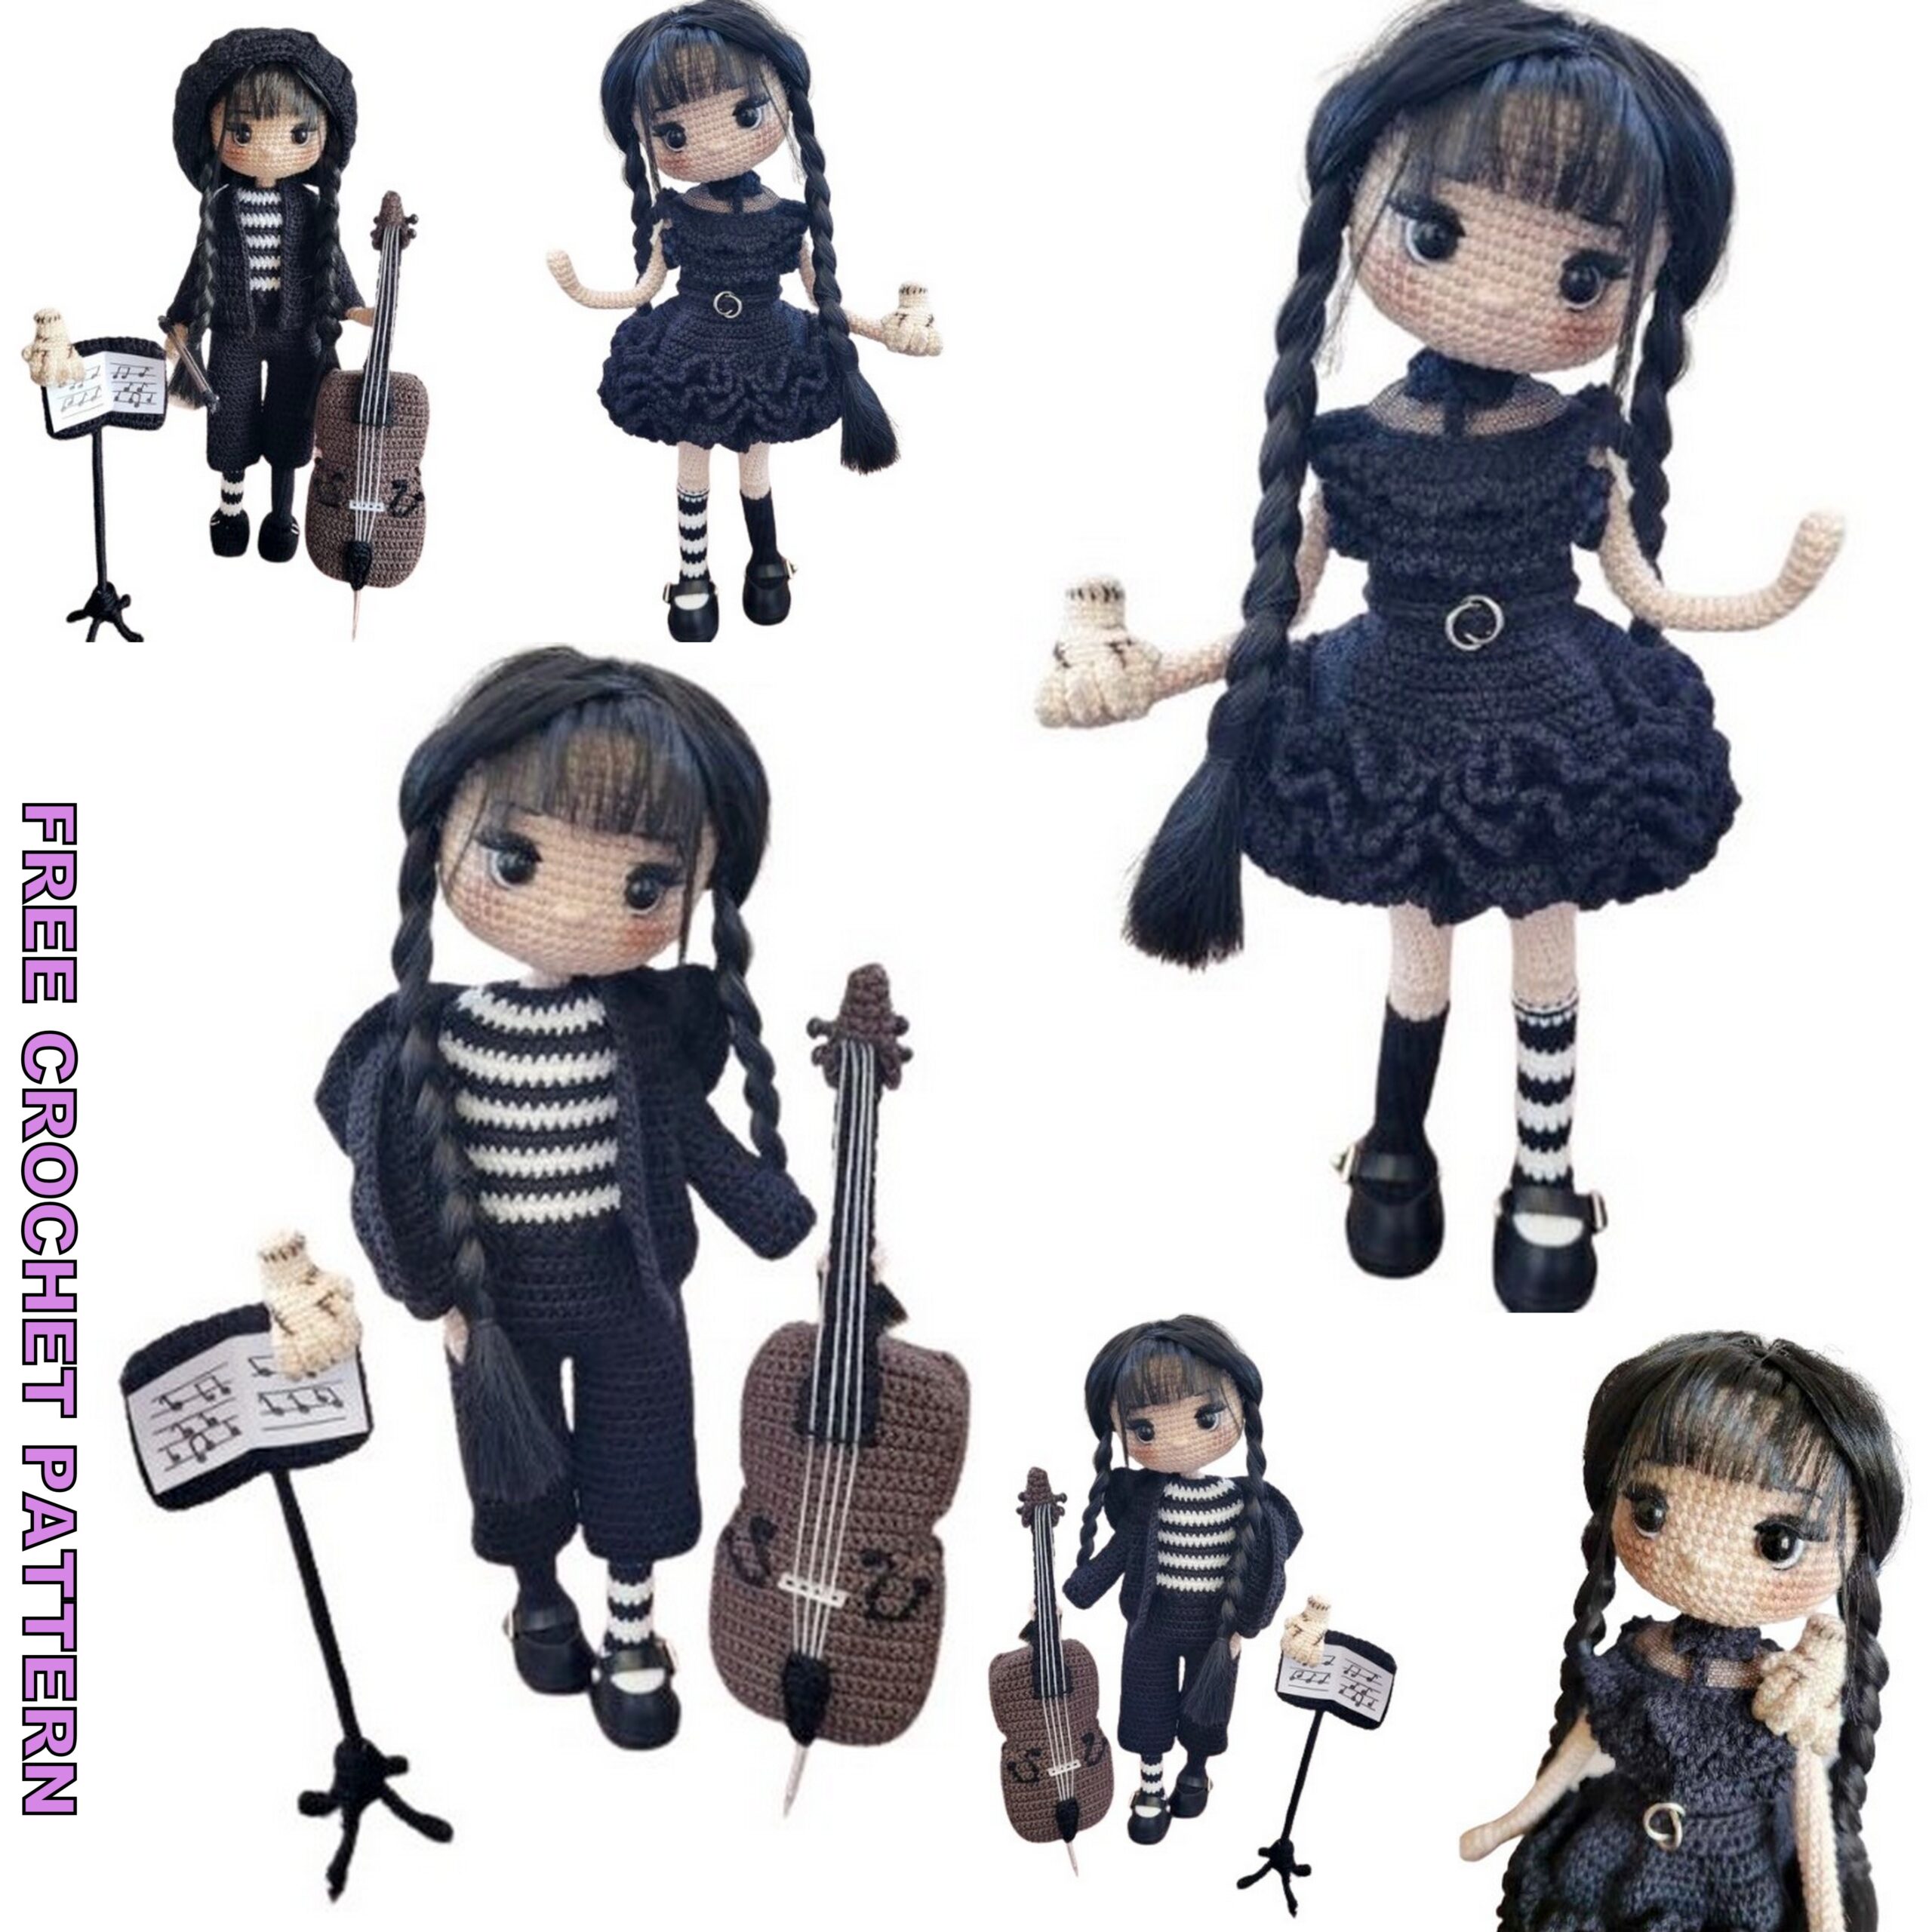
Today, the new daily crochet pattern Amigurumi Wednesday Doll Free Crochet Pattern, I want to give you some information about this pattern;

MATERIALS USED
● Catania 263 Leather color 1 pc.
● Catania 106 White 1 pc.
● Catania 110 Black 2 pcs.
● Black eyes 8mm
● 1m wire 2.5mm
● Synthetic black hair (for wig)
● 6 black buttons
● Black tulle 10×5
● 4 metal rings (can be
use key rings)
● Fine brown thread for
embroidery things
● Hook 2.20 mm
● Hook 1.25 mm
ABBREVIATIONS
ch: air loop
magic ring: amigurumi ring
sc: single crochet
(…)*: number of repetitions
inc: increase
dec: decrease
dec-TR: triple decrease, from 3 sc knit 1 sc
inc-TP: triple increase, knit 3 sc in one loop
For PP: for front loops
For the RFP: for the rear hinges
dc: double crochet
С2Н: column with 2 crochets
PSN: double crochet
inc-PSN: increase with a half-column with a crochet
dec-PSN: double crochet half-column
slst: connecting post
HEAD: (Knit in circular spiral rows)
- 6 sc in magic ring (6 sc)
- 6 inc (12 sc)
- (1 sc, 1 inc) * 6 (18 sc)
- (2sc, 1inc) * 6 (24sc)
- (3 sc, 1 inc) * 6 (30 sc)
- (4 sc, 1 inc) * 6 (36 sc)
- (5 sc, 1 inc) * 6 (42 sc)
- (6 sc, 1 inc) * 6 (48 sc)
- (7 sc, 1 inc) * 6 (54 sc)
- (8 sc, 1 inc) * 6 (60 sc)
11-22. 12 rows (60sc) - (8 sc, 1 dec) * 6 (54 sc)
- 3 sc, 1 dec, (7 sc, 1 dec)*5, 4 sc (48 sc)
- (6 sc, 1 dec) * 6 (42 sc)
- 2 sc, 1 dec, (5 sc, 1 dec)*5, 3 sc (36 sc)
- (4 sc, 1 dec) * 6 (30 sc)
- 1 sc, 1 dec, (3 sc, 1 dec)*5, 2 sc (24 sc)
- (2 sc, 1 dec) * 6 (18 sc)
- (2 sc, 1 dec) * 5, 1dec (13 sc)
EYES: Insert between 17 and 18 rows, at a distance of 6 sc between them.
There will be 8 sc between the holes for the eyes, after inserting the visible distance
will be 6 sc.
NOSE: We embroider the nose 2 rows below the eyes. Nose width 2 sc. Making one
stitch, and then we wind around this stitch 2 times.
EYELASHES: Embroider as in the photo.
HANDS: (Knit in circular spiral rows)
- 6 sc in magic ring (6 sc)
- (4 inc, 2 sc) (10 sc)
3-6. 4 rows (10 sc)
Bend the ends of the wire and insert into your hand. We take a wire length
30 cm, 15 cm in each hand. - 3sc, 3dec, 1 sc (7 sc)
8-19. 12 rows (7 sc) - 1 sc, 2 inc, 4 sc (9 sc)
- 9sc (9 sc)
- 2 sc, 1 dec, 5 sc (8 sc)
23-34. 12 rows (8 sc)
LEGS: (knitting in circular spiral rows)
We start with black yarn.
7 ch, from the 2nd loop from the hook:
5sc, inc-tr, 4 sc, 1inc (14 sc)
- 1 inc, 4 sc, 1 inc, 1 sc, 1 inc, 5 sc, 1 inc (18 sc)
- 1 sc, 1 inc, 5 sc, 1 inc, 1 sc, 1 inc, 6 sc, 1 inc,
1sc (22 sc) - For RFP 22 sc
5-6. (22sc) – 2 rows - 7 sc, 1 dec, 1 sc, dec-tr, 1 sc, 1 dec, 6 sc (18 sc)
- 7 sc, 2 dec, 7 sc (16 sc)
- 6 sc, dec-tr, 7 sc (14 sc)
- 1dec, 4sc, 1dec, 4sc, 1dec (11sc)
- (11sc)
- 1 inc, 9 sc, 1 inc (13 sc)
13-29. 17 rows (13sc) - Color change to flesh, for RFP (13 sc)
- (13sc)
- 3 sc, move row marker here. 1 dec
9sc, 1dec (11 sc) - 4 sc, 3 inc, 4 sc (14 sc)
- 1 inc, 12 sc, 1 inc (16 sc)
- 3 sc, 5 dec, 3 sc (11 sc)
- 1inc, 9 sc, 1inc (13 sc)
- (13sc)
- 1 inc, 11 sc, 1 inc (15 sc)
39-46. 8 rows (15sc) - 1 inc, 3 sc, 1 inc, 10 sc (17 sc)
48-49. (17 sc) 2 rows - 2sc, 1inc, 4sc, 1inc, 9sc (19sc)
51-52. (19sc) – 2 rows

SECOND LEG (RIGHT):
We start with black yarn.
7 ch, from the 2nd from the hook:
5sc, inc-tr, 4 sc, 1inc (14 sc)
- 1 inc, 4 sc, 1 inc, 1 sc, 1 inc, 5 sc, 1 inc (18 sc)
- 1 sc, 1 inc, 5 sc, 1 inc, 1 sc, 1 inc, 6 sc, 1 inc,
1 sc (22 sc)
Change yarn to white. - For RFP 22 sc
5-6. (22sc) – 2 rows
Change yarn to black. - 7 sc, 1 dec, 1 sc, dec-tr, 1 sc, 1 dec, 6 sc (18 sc)
- 7 sc, 2 dec, 7 sc (16 sc)
- 6 sc, dec-tr, 7 sc (14 sc)
Change yarn to white. - 1 dec, 4 sc, 1 dec, 4 sc, 1dec (11 sc)
- (11 sc)
- 1 inc, 9sc, 1inc (13 sc)
13-15. black (13sc) 3 rows
16-18. white: (13sc) 3 rows
19-21. black: (13sc) 3 rows
22-24. white: (13sc) 3 rows
25-27. black: (13 sc) 3 rows
28-29. white: (13sc) 2 rows - Change yarn to flesh color, for RF 13 sc
- 13sc
- Knit 3 more sc and place a row marker here. 1 dec, 9 sc, 1 dec
- 4 sc, 3 inc, 4 sc (14 sc)
- 1 inc, 12 sc, 1 inc (16 sc)
- 3 sc, 5 dec, 3 sc (11 sc)
- 1 inc, 9sc, 1 inc (13 sc)
- (13sc)
- 1 inc, 11 sc, 1 inc (15 sc)
39-46. 8 rows (15sc) - 1sc, 1inc, 10sc, 1inc, 2sc (17sc)
48-49. (17 sc) – 2 rows - 2 sc, 1 inc, 11 sc, 1 inc, 2 sc (19sc)
51-52. (19sc) – 2 rows
Do not cut the thread, we will continue to knit the body.
Return to the 30th row and tie the front loops of slst. Feet stuffed

BODY: (knit in circular spiral rows)
2 ch, attach to the inner middle of the second legs
6 sc, 1 inc, 4 sc, 1 inc, 7 sc, 2 sc in a chain, 7 sc,
1 inc, 4 sc, 1 inc, 6 sc, 2 sc in a chain (46 sc)
2-9. 8 rows (46sc)
- 7 sc, 1 dec, 4 sc, 1 dec, 15 sc, 1 dec, 4 sc, 1 dec, 8 sc (42 sc)
- 42 sc
- 6 sc, 1 dec, 6 sc, 1 dec, 10 sc, 1 dec, 6 sc, 1 dec, 6 sc (38 sc)
- 38sc
- 5 sc, 1 dec, 6 sc, 1 dec, 7 sc, 1 dec, 6 sc, 1 dec, 6 sc (34 sc)
- (34 sc)
- Change color to flesh. For RFP 34 sc
- 8 sc, 1 dec, 14 sc, 1 dec, 8 sc (32sc)
18-26. 9 rows (32sc) - 8 sc, 1 inc, 14 sc, 1 inc, 8 sc (34 sc)
28-30. (34sc) – 3 rows - We knit hands:
9 sc on the body, 4 sc on the body and arm simultaneously, 12 sc on the body, 4 sc on the body and arm
at the same time, 5 sc on the body (34sc) 32: 9 sc on the body, 4 sc on the outside of the arm, 12 sc
on the body, 4 sc on the outer part of the arm, 5 sc on the body (34sc)
- (34 sc)
- 7 sc, 4 dec, 8 sc, 4 dec, 3 sc (26 sc)
- 6 sc, 1 dec, dec-tr, 1 dec, 5 sc, 1 dec, dec-tr, 1 dec, 1 sc (18 sc)
- 4 sc, 3dec, 2sc, 3dec (12sc)
37-40. (12 sc) – 4 rows
DRESS: (Knitting in turning rows with 1 turning ch)
- 48ch, skip 7 ch, from the 8th ch from the hook: 41sc
- For PP 8 sc, 6 ch, skip 6 st, 15 sc, 6 ch, skip 6 st, 6 sc (41 sc)
- 6 sc, (1 sc, skip ch 1, 2 sc, skip ch 1, 1 sc), 15 sc, (1 sc, skip 1 ch, 2sc, skip 1 ch, 1 sc), 8 sc (41sc)
- For PP (37 sc)
- (37sc)
- For PP (37sc)
- 7 ch, from the 8th st from the hook: (37sc)
8-12. (37sc) – 5 rows - 7 ch, from the 8th st from the hook (37sc)
- (37sc)
- (1sc, 1inc) * 18, 1sc (55sc)
16-17. (55sc) – 2 rows - (2sc, 1inc) * 18, 1sc (73sc)
- 7 ch, from the 8th st from the hook: (73sc)
20-23. (73sc) – 4 rows - For PP (73sc)
- (73 sc)
- For PP (73sc)
- (73sc)
- For PP (73sc)
- (73sc)
- For PP (73sc)
- 7 ch, from the 8th ch from the hook: (73sc)
32-33. (73sc) – 2 rows - (3 ch, sl-st in the next loop) * repeat until the end of the row
Dress belt: ch 36, from the 2nd ch from the hook: 35sc
Leave the ends of the threads on 2 sides,
then to tie the belt.
Ruffles on the bodice of the dress:
- We knit in the rows where we knitted for the PP (2, 4 and 6 rows)
- (3 dc, 1 inc) * 10, 1 dc (51 dc)
- (Ch3, sl-st in next st) * repeat to end of row
Ruffles on the skirt of the dress:
- We knit in the rows where we knitted for the PP (24, 26, 28 and 30 rows)
- (3 dc, 1 inc) * 18, 1 dc (91 dc)
- (ch 3, sl-st in next st) repeat to end of row
Collar:
- Ch 15, from the 2nd p. from the hook:
- 2 sc, 1 dc, 1 dc, (1c2n, 1 ch, slst in c2n), 1 dc, slst,
1 dc, (1c2n, 1 ch, slst in c2n), 1 dc, 1 dc, 3 sc

Leave long ends on both sides to tie around the neck.
In order to connect the collar and dress, I tied a chain of 4 ch and sewed it in the center to dress and collar.
You can also sew tulle between the collar and the top of the dress.
We select the length and width of the tulle, trying on your doll. Sew tulle to the 1st row of the dress, the remaining. Sew a part of the tulle on the back where the buttons will be.

Shoes (knitting in a circle with a connection of rows, at the end of each row we make sl-st and lifting loops)
- 8 ch, from the 2nd p. from the hook: 6 sc, inc-tr, 5 sc, 1 inc (16 sc)
- 1 sc, 1 inc, 4 sc, 1 inc, 1 sc, 1 inc, 6 sc, 1 inc (20 sc)
- 1 inc, 7 sc, 1 inc, 1 sc, 1 inc, 7 sc, 1 inc, 1 sc (24 sc)
- 2 sc, 1 inc, 5 sc, (1 inc, 1 sc) * 4, 5 sc, 1 inc, 1 sc, 1 inc (31 sc)
- For RFP (31sc)
6-8. (31sc) 3 rows - 1dec, 5sc, (1dec, 1sc)*5, 1dec, 5sc, 1dec (23sc)
For the right leg, 10th row:
-7slst, 8ch, turn, 7slst in a chain, 16slst in a common canvas
For the left leg, 10th row:
-16 slst, 8 ch, turn, 7slst along the chain, 7 slst along the common canvas.

We sew the buckle first to the strap, and then to the shoes.
WIG: (knit in circular spiral rows) (Knit loosely or crochet one size larger than recommended)
- 6 sc in magic ring (6sc)
- For RFP 6inc (12sc)
- (1 sc, 1 inc) * 6 (18 sc)
- For RFP (2sc, 1inc) * 6 (24 sc)
- (3 sc, 1 inc) * 6 (30 sc)
- For ZP (4 sc, 1 inc) * 6 (36 sc)
- (5 sc, 1 inc) * 6 (42 sc)
- For RFP (6 sc, 1 inc) * 6 (48 sc)
- (7 sc, 1 inc) * 6 (54 sc)
- For ZP (8 sc, 1 inc) * 6 (60 sc)
- 60sc
- For ZP (60 sc)
- (60sc)
- For ZP (60 sc)
- (60sc)
- For ZP (60 sc)
17-18. (60sc) – 2 rows

Put the wig on your head with the right side – on 6 rows above the eyebrows. Sew it on or glue it on hot glue. Or sew the hair to the wig first, and then then fasten the finished wig to your head. I use the second option – first I sew the hair, then I’m already putting everything on my head.

Now we will sew our synthetic hair in the places where we knitted for the RFP.
We apply the hair at regular intervals, starting from the bottom and to the very top.
The direction of hair sewing is shown by the white arrow in the photo. End of sewing
marked with a red dot. The place where the amigurumi ring was will not close.
When sewing, do not pull the sewing thread too tight to prevent shrinkage.
wig. Let the thread be not too long so as not to tangle the hair. Sew slowly and carefully.
Then, using a straightener (hair straightener) on minimum temperature to smooth the hair, giving
the desired shape. Separate the strands to the left, then to the right side, covering the crown and forming a beautiful parting.
If you want, you can cut the bangs from the bottom strands. If you’re going for bangs, trim first according to the level of the nose, slightly twist with an iron, and only then cut to desired length.

ITEM: (knit in circular rows with join and instep stitches)
First you need to tie all the fingers.
Large: 6sc in magic ring, 3 rows of 6 sc
Index-Middle-Nameless: 6sc in magic ring, 5 rows of 6 sc
Little finger: 6sc in magic ring, 4 rows of 6 sc
1: Start with attachments yarn to the little finger and knit 3 sc to the other finger.
Attaching the fingers knit for each finger 3 sc, attaching in order unnamed, middle and index fingers.
The total will be 12 sc.
On the reverse side knit another 12 sc.
- (2 sc, 1 dec) * 6 (18 sc)
3-4. 18sc – 2 rows - 9 sc, 3 sc on the thumb, 6 sc (18 sc)
- 9 sc, 3 sc on the thumb, 6 sc (18 sc)
- Knit in turning rows.
- 1ch, turn, 6 sc
- 1ch, turn, 6 sc
- 1ch, turn, 6 sc
- 1ch, turn, 6 sc
- 2 dec, (2 sc, 1 dec) * 3, 1 sc, 2 dec (14sc)
- 6 sc, 1 dec, (in loops between the 5th and 6th rows (9 sc), 2dec (18 sc)
You can insert a wire inside your hand to give your fingers
different shape. Insert into all fingers except the thumb. - (1 sc, 1 dec) * 6 (12 sc)
11-13. 12 sc – 3 rows
Wrist Plug:
- 6 sc in magic ring
- 6 inc (12 sc)
Stuff your wrist with filler and the inside of the hand. Round sew the wrist cap on top black thin thread, loop by loop. And embroider imitation seams with black thread, as in the picture.
FINISH