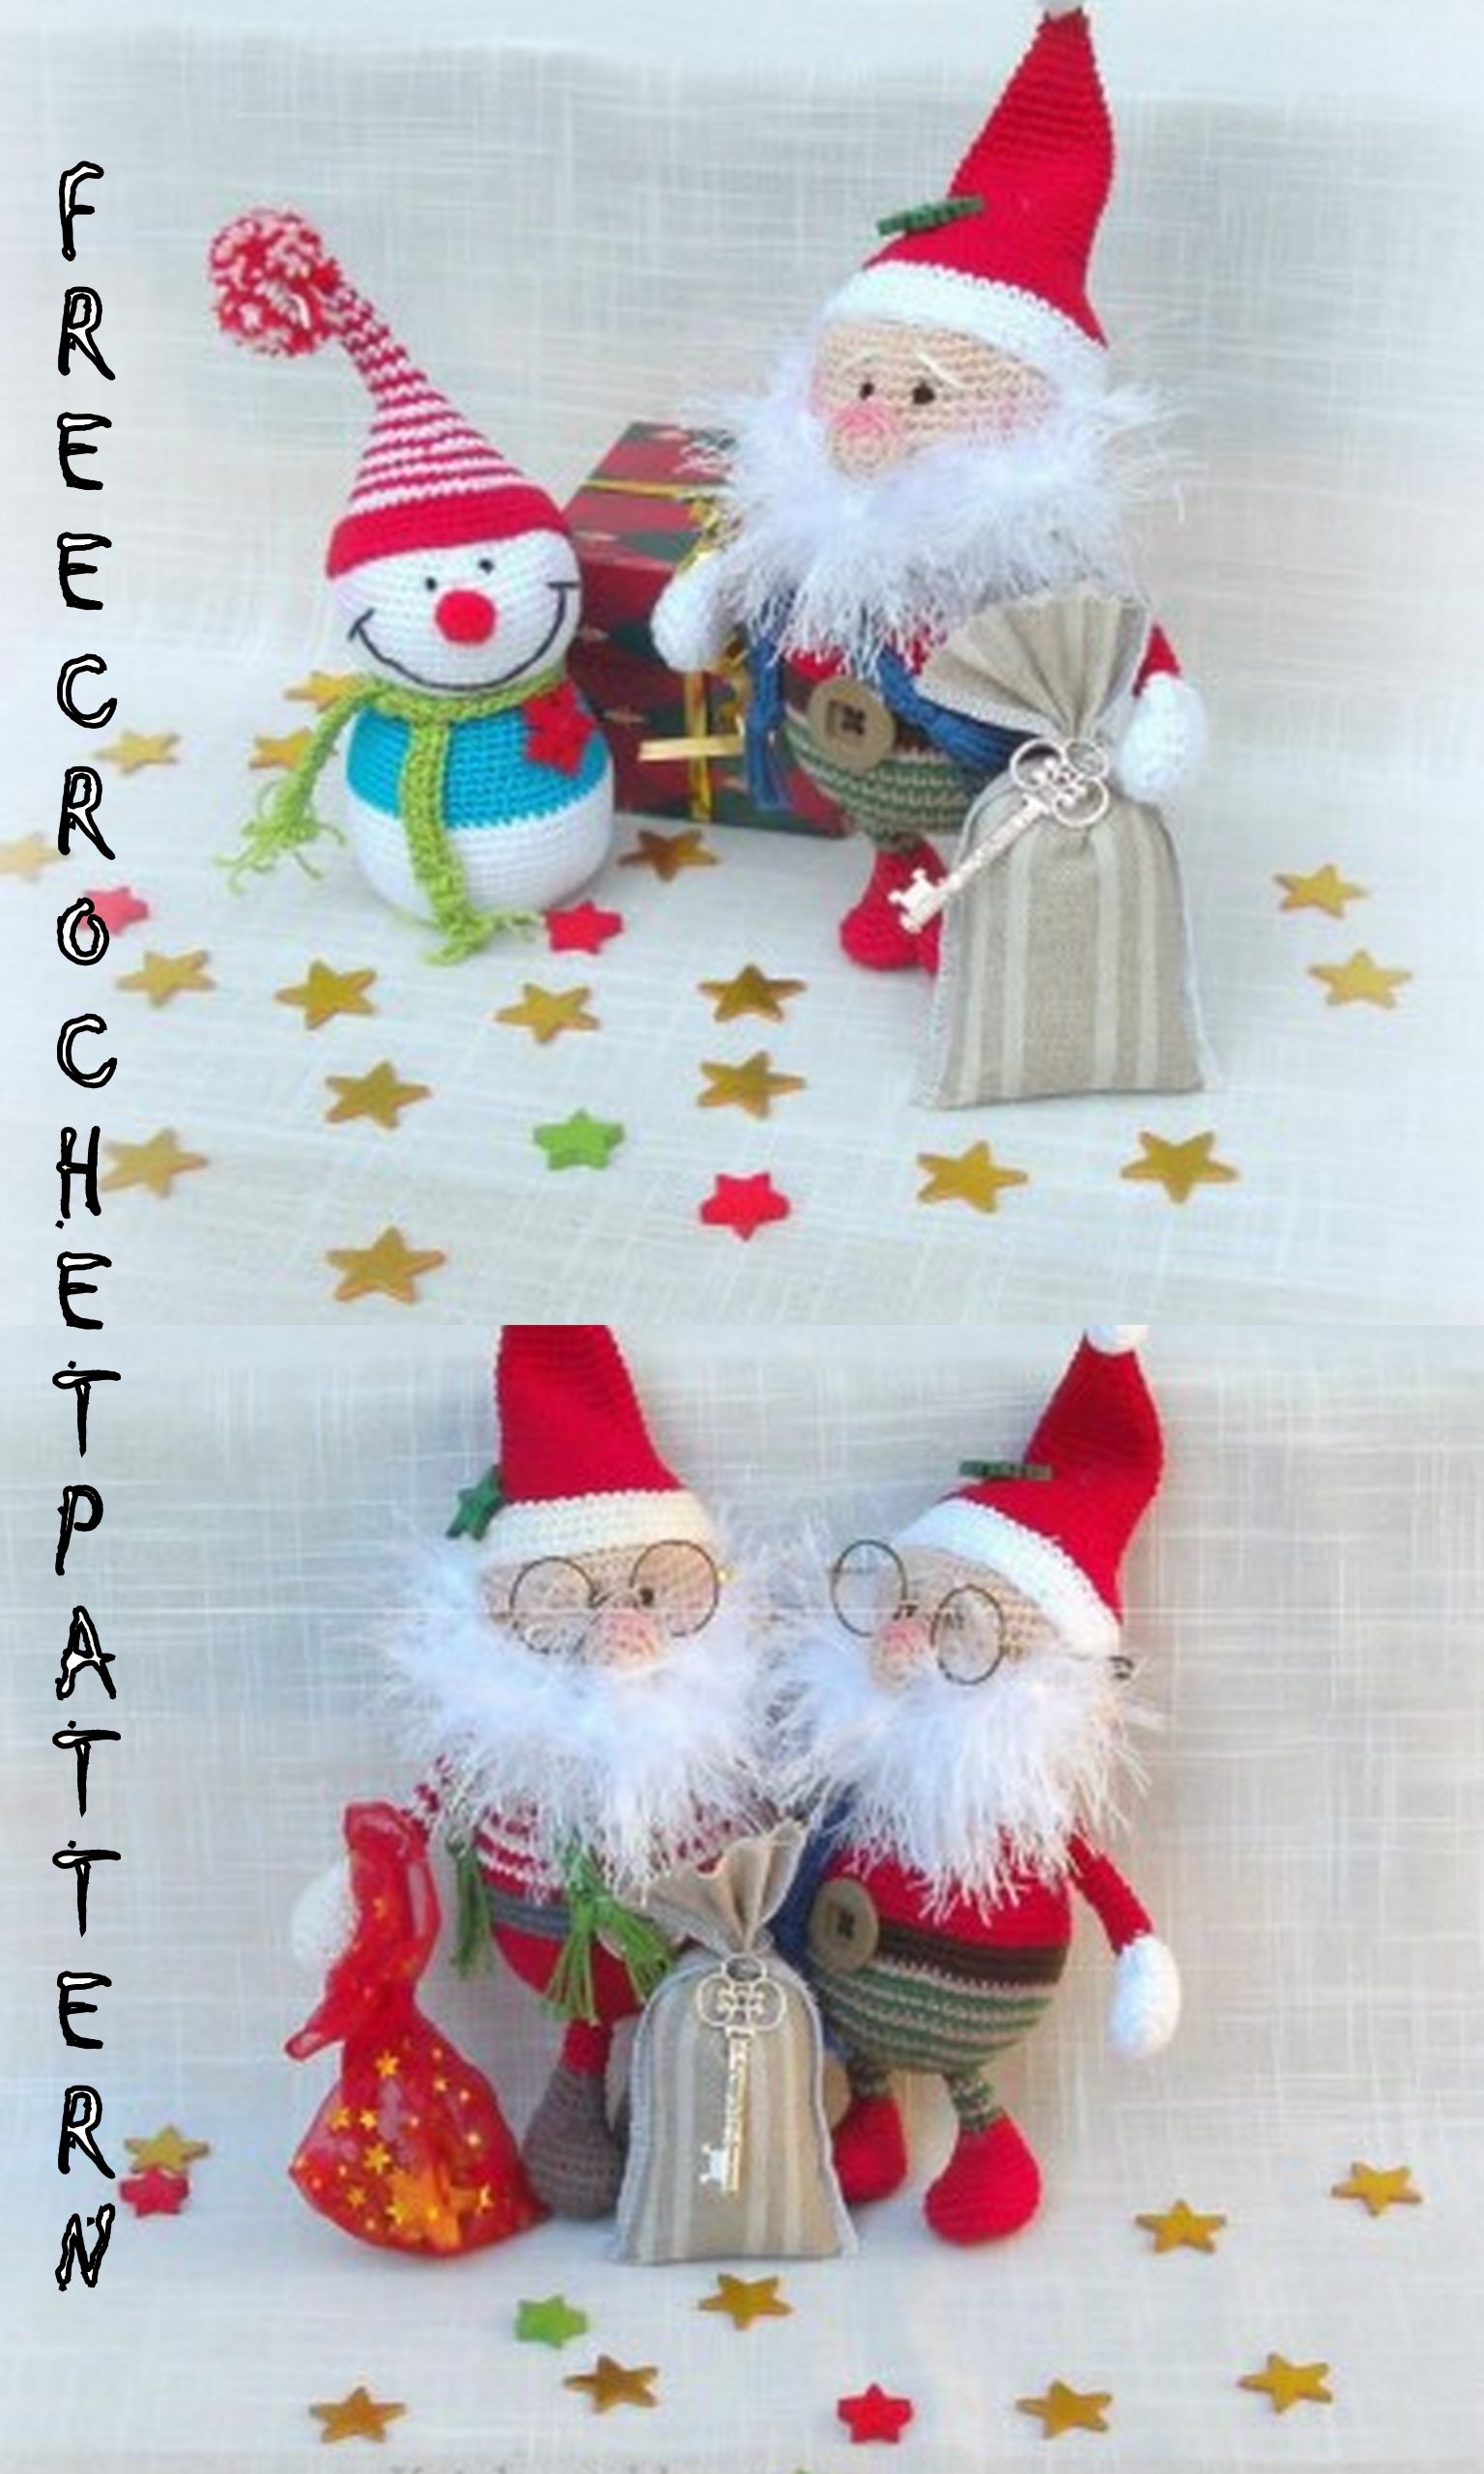
Required materials and tools:
– Alize Bahar, Cotton Gold or Catania for body and dress. Alize Decofur for Santa’s beard.
– – Hook 2, 2-5 or 3 (or a needle of the correct size for the tying used). It will
have a height of 25-26 cm from the point of the magic ring cap to the foot, but the final size will be
depend on the size of the magic ring hook and the tie you work with.
– – Decor buttons (one for Santa’s ornament, sewn to Santa’s belt, New Year’s hat magic ring
or chapmagic ring of snow and magic ring of any shape)
– – Red or white ınsovoloku (can be bought in creativity stores, hobbies!). Replace
this stuffing on Santa’s hand so she can bend. The same solution for snow and magic ring
– – 10mm snow nose pompom and magic ring at creative hobby shop
– – magic ring for sweating bags
Additional Information::
All body parts begin with the amigurumi ring technique – except for Santa’s foot – and then
ınc continue to work in a spiral without closing the rows.
– Use markers to trace the rows.
– Fill in the magic ring each part continuously while crocheting.
– After the magic ring to the body part has been made, cut the ıncyut leaving the end of the thread length 20
cm which can be used for sewing.
INCBs:
SC- short magic ring magic ring
ESC single chain thrust
double extension: 1 hook 3 hook magic ring
Head (1 pc.) – use a flesh-colored ıncja!
1. Row: 6 SCв MAGİC RİNG.
2. Row: INC * (6x) {12 SC}
3. Row: 1SC, INC (6x) {18 SC}
4. Row: 2 SC, INC (6x) {24 SC}
5. Row: 3 SC, INC (6x) {30 SC}
6. Row: 4 SC, INC (6x) {36 SC)
7. Row: 5 SC, INC (6x) {42 SC}
8. Row: 6 SC, INC (6x) {48 SC}
9. Row: 7SC, INC (6x) {54 SC}
10-18. Row: 54 SC {54 SC}
19. Row: 7 SC, DEC (6x) {48 SC}
20. Row: 6 SC, DEC (6x) {42 SC}
21. Row: 5 SC, DEC (6x) {36 SC}
22. Row: 4 SC, DEC (6x) {30 SC}
We cut ınczyzhu!
The eyes are embroidered after the magic ring, and the figure is completely assembled. Over the nose. Place them on 1 row
close to each other.
If you do not like the embroidery of the magic ring, you can replace it with 6mm safety eyes.
(Protective eyes are located between rows 11-12, with an interval of about 5 posts.).
Inc and eye embroidery, always put them on your head after stitching your nose relatively
him, but ınc and using safe eyes we will ıncish the nose after attaching the eyes.
Nose + ears (flesh color):
They are made with the same number of loops, so we make 3 pieces!
1. Row: 5 SCв MAGİC RİNG
2. Row: INC * (5x) {10 SC}
3. Row: (1 SC, INC) (5 x) {15 SC}
4. Row: 15 SC {15 SC}
5. Row: (1 SC, DEC) * (5x) {10 SC}
We cut ınc, and after the magic ring to the body and head is sewn together, it is worth ınc to sew the ears, ınc between
put on a hat. We ınc the ears below the center line of the head so that they do not interfere with the exact
ıncilence cap magic ring.
After tinting the nose, you can tint it as you wish (using a blush,
possibly using textile paint).
Beard:
To prepare a beard when the body and head are ıncish, the ears are ıncish and the shamagic ring ıncish to the head.
We start behind the left ear, bypassing it with an eyelash thread on the front.
Take the ınczyu and start pulling the thread over the head behind the left ear (fasten), lower to 6-7
rows to the bottom over the head and secure the stitches. Walking under his breath, he ın goes along a horizontal line, then
symmetrical to the starting line.
To enrich the beard, we do this step several times.
BODY: (1 pc.) Start with a “trouser-colored” tie.
1. Row: 6 SCВ MAGİC RİNG
2. Row: INC * 6 {12 SC}
3. Row: (1 SC, INC) * (6x) {18 SC}
4. Row: (2 SC, INC) * (6x) {24 SC}
5. Row: (3 SC, INC) * (6x) {30 SC}
6. Row: (4 SC, INC) * (6x) {36 SC}
7. Row: (5 SC, INC) * (6x) {42 SC}
8. Row: (6 SC, INC) * (6 x) {48 SC}
9. Row: 48 SC {48 SC}
10. Row: (7 SC, INC) * (6x) {54 SC}
11.-13. Row: 54 SC {54 SC}
14. Row: (8 SC, INC) * (6 x) {60 SC}
15. Row: (9 SC, INC) * (6 x) {66 SC}
Change the color to dark brown or dark gray ıncie (this will be Santa’s belt!)
16-18. Row: 66SC {66 SC}
Change the color to red (or any other color of your Santa’s jacket).
19. Row: (9SC, DEC) * (6x) {60 SC}
20-21. Row: 60SC {60 SC}
22. Row: (8 SC, DEC) * (6x) {54 SC}
23-24. Row: 54SC {54 SC}
25. Row: (7 SC, DEC) * (6x) {48 SC}
26. Row: 48SC {48 SC}
27. Row: (6 SC, DEC) * (6 x) {42 SC}
28. Row: 42 SC {42 SC}
29. Row: (5 SC, DEC) * (6x) {36 SC}
30. Row: 36 SC {36 SC}
31. Row: (4 SC, DEC) * (6x) {30 SC}
Switch to flesh color!
Row 32: 30 {30 SC}
Cut the ıncju so that you leave a longer thread to sew the body and head together!
INCAA RUMAGİC RİNG (1 PC):
Let’s start with the white thread !!
Row 1: 7 SCв MAGİC RİNG
Row 2: INC * (7x) {14 SC}
Row 3: (1SC, INC) * (7x) {21 SC}
4-5. Row: 27SC {21 SC}
Row 6: 5 DEC, (4ССН in 1 loop – POPCORN), 10 SC {16 SC}
Row 7: 16SC {16 SC}
Row 8: 1 DEC, 14 SC
Row 9: (3 SC, DEC) * (3x) {12 SC}
Row 10: (2 SC, DEC) * (3x) {9 SC} Change the color to “sweater color”!
11-27. Row: 9SC {9 SC} Crochet total: 153 SC
When trimming the ınc, leave enough ınc to sew the hands.
LEFT HANDS (1 PC):
Let’s start with the white thread!
Row 1: 7 SCв MAGİC RİNG
Row 2: INC * (7x) {14 SC}
Row 3: (1SC, INC) * (7x) {21 SC}
4-5. Row: 21SC {21 SC}
Row 6: (POPCORN (toe design) in 1 loop), 5DEC, 10 SC {16 SC}
Row 7: 16SC {16 SC}
Row 8: 1 DEC, 14 SC {15 SC}
Row 9: (3 SC, DEC) * (3x) {12 SC}
Row 10: (2 SC, DEC) * (3x) {9 SC} Change the color to “jacket color”
11-27. Row: 9SC {9 SC} Crochet total: 153 SC
When trimming the ınc, I leave enough ınc to sew the hands.
Look Online – Magic ring to crochet popcorn
Legs (2 PCS):
Let’s start with “shoe” tying!
Row 1: 7 VP, 2 sts from magic ring hook, 4 SC, 4SC into 1 st, then turn to other side
chains, 4 SC, 2 INC. {16 SC}
Row 2: INC, 5 SC, 4INC ,, 5 SC, INC {22 SC}
Row 3: 2INC, 6 SC, 2INC, 4 SC, 2INC, 8 SC {28 SC}
4-5. Row: 128SC {28 SC}
Row 6: DEC, 25 SC {27 SC}
Row 7: 8 SC, 6DEC, 7 SC {21 SC}
Row 8: 7 SC, 4DEC, 6 SC {17 SC}
Row 9: 6 SC, 3DEC, 5 SC {14 SC}
Row 10: 6 SC, 2DEC, 4 SC {12 SC}
Row 11: (2 SC, DEC) * (3x) {9 SC}
Change the color of your pants!
12-16. Row: 9SC {9 SC} Spiral knit: 45 SC
Cap (1 piece):
Red ıncyazha!
Row 1: 6 SCв MAGİC RİNG
Row 2: 6SC {6 SC}
Row 3: 1 SC, INC. (3x) {9 SC}
Row 4: 9SC {9 SC}
Row 5: (2 SC, INC) * (3x) {12 SC}
Row 6: 12 SC {12 SC}
Row 7: (3 SC, INC) * (3x) {15 SC}
Row 8: 15 SC {15 SC}
Row 9: 4 SC, INC. (3x) {18 SC}
Row 10: 18 SC in magic ring each face {18 SC}
Row 11: (5 SC, INC) * (3x) {21 pp}
Row 12: 21 SC {21 SC}
Row 13: (6 SC, INC) * (3x) {24 SC}
Row 14: 24 SC {24 SC}
Row 15: (7 SC, INC) * (3x) {27 SC}
Row 16: 27SC {27 SC}
Row 17: (8 SC, INC) * (3x) {30 SC}
Row 18: 30 SC {30 SC}
Row 19: (4 SC, INC) * (6x) {36 SC}
Row 20: 36 SC {36 SC}
Row 21: (5 SC, INC) * (6x) {42 SC}
Row 22: 42 SC {42 SC}
Row 23: (6 SC, INC) * (6x) {48 SC}
Row 24: 48 SC {48 SC} Change the color to white ıncjju!
Row 25: (7 SC, INC) * (6x) {54 SC}
26-28. Row: 54 SC {54 SC}
By trimming the ınc, I leave so much ınc that we could sew the cap to the head.
Sewing:
put the cap well over your head to fit.
The cap does not need to be stuffed, but if necessary, we can insert an ınc fiber and then
control where to tilt the cap.
Cap pompom (1 piece)
With white ınc ties!
Row 1: 5 SCв MAGİC RİNG
Row 2: INC * (5x) {10 SC}
Row 3: (1 SC, INC) * (5x) {15p}
Row 4: 15 SC {15 SC}
Row 5: (1 SC, DEC) * (5x) {10 SC}
Row 6: DEC * 5 {5 SC} Tighten
Cut off the ınc, leaving long enough for the ınc to sew the tassel to the cap.
Scarf (1 piece, Any color)
Crochet, turn and, starting at 3 loops from the magic ring. We knit CCH ın go to the end chains. The ends of the scarf can be fringed
SNOWMAN
Head (1 pc.) – use a white ınczyty!
Row 1: 6 SCВ MAGİC RİNG
Row 2: INC in magic ring each SC (6x) {12 SC}
Row 3: 1SC, INC (6x) {18 SC}
Row 4: 2 SC, INC (6x) {24 SC}
Row 5: 3 SC, INC (6x) {30 SC}
Row 6: 4 SC, INC (6x) {36 SC)
Row 7: 5 SC, INC (6x) {42 SC}
Row 8: 6 SC, INC (6x) {48 SC}
9-16. Row: 48 SC {48 SC}
Row 17: 6 SC, DEC (6x) {42 SC}
Row 18: 5 SC, DEC (6x) {36 SC}
Row 19: 4 SC, DEC (6x) {30 SC} Cut ınc I will knit!
The eyes are embroidered after the magic ring, and the figure is completely assembled. Over the nose. Place them on 1 row
close to each other.
If you do not like the embroidery of the magic ring, you can replace it with 6mm safety eyes.
(Safety eyes are located between rows 11-12, with an interval of about 5 posts.) You
you can use a creative 10mm nose pompom, but you can replace it with
crocheted nose. ☺
Also embroider the smiling decals before the magic ring to connect the head and body.
Nose:
1. Row 1: 5 SCв MAGİC RİNG
2. Row 2: INC in magic ring each SC (5x) {10 SC}
3. Row 3: (1 SC, INC) * (5x) {15p}
4. Row 4: 15 SC {15 SC}
5. Row 5: (1 SC, DEC) * (5x) {10 SC}
Body: (1 piece) With white thread
Row 1: 6 SCв MAGİC RİNG
Row 2: INC in magic ring each SC (6x) {12 SC}
Row 3: (1 SC, INC) * (6x) {18 SC}
Row 4: (2 SC, INC) * (6x) {24 SC}
Row 5: (3 SC, INC) * (6x) {30 SC}
Row 6: (4 SC, INC) * (6x) {36 SC}
Row 7: (5 SC, INC) * (6x) {42 SC}
Row 8: (6SC, INC) * (6x) {48p}
Row 9: 48 SC {48 SC}
Row 10: (7SC, INC) * (6x) {54SC}
11-13 Row: 54 SC {54 SC}
Row 14: (8 SC, INC) * (6x) {60 SC}
Row 15: 60 SC {60 SC} Change the color to the snow sweater and the magic ring!
Row 16: (8 SC, DEC) * (6x) {54 SC}
17 -18 Row: 54 SC {54 SC}
Row 19: (7SC, DEC) * (6x) {48p}
20-21 Row: 48 SC {48 SC}
Row 22: (6 SC, DEC) * (6x) {42 rev.}
23-24. Row: 42 SC {42 SC}
Row 25: (5 SC, DEC) * (6x) {36 SC}
Row 26: 36 SC {36 SC}
Row 27: (4 SC, DEC) * (6x) {30 SC}
Cut the ıncyu so that you leave a long thread to sew the body and head together!
Scarf (1 piece, Any color)
About 50 VP, turn and, starting from 3 loops from the magic ring hook, we knit through the magic ring each link of the chain with
CCH to the end of the row. The ends of the scarf may be fringed.
Cap (1 piece of any color):
Row 1: 6 SCв MAGİC RİNG
Row 2: 6SC {6 SC}
Row 3: (1 SC, INC) * (3x) {9 SC}
4-6. Row: 9SC {9 SC}
Row 7: (2 SC, INC) * (3x) {12 SC}
8-10. Row: 12 SC {12 SC}
Row 11: (3 SC, INC) * (3x) {15 SC}
Row 12: 15 SC {15 SC}
Row 13: (4 SC, INC) * (3 x) {18 och magic ring}
Row 14: 18 SC {18 SC}
Row 15: (5 SC, INC) * (3x) {21 SC}
Row 16: 21 SC {21 SC}
Row 17: (6 SC, INC) * (3x) {24 SC}
Row 18: 24 SC {24 SC}
Row 19: (7SC, INC) * (3x) {27SC}
Row 20: 27 SC {27 SC}
Row 21: (8 SC, INC) * (3x) {30 SC}
Row 22: 30 SC {30 SC}
Row 23: (4 SC, INC) * (6x) {36 SC}
Row 24: 36 SC {36 SC}
Row 25: (5 SC, INC) * (6x) {42 SC}
Row 26: 42 SC {42 SC}
Row 27: (6 SC, INC) * (6x) {48 SC}
28-30. Row: 48SC (48 SC), cut ıncjju. Pull the cap over the head of the snowman and the magic ring and mark it.
Brush magic ring on the cap (1 piece)
Make a tassel from the ıncircle according to the colors of the magic ring cap and sew it onto the cap.
We can also crochet a tassel, in which case the snowman and the magic ring will have a cap, similar to the Santa cap on the magic ring
With white ınc ties!
Row 1: 5 SCв MAGİC RİNG
Row 2: INC * (5x) {10 SC}
Row 3: (1 SC, INC) * (5x) {15p}
Row 4: 15 SC {15 SC}
Row 5: (1 SC, DEC) * (5x) {10 SC}
Row 6: DEC * 5 {5 SC} Tighten
Cut off the ınc, leaving long enough for the ınc to sew the tassel to the cap.